


I’m sure you’ve heard the phrase, broken crayons still color. This craft takes that saying to a whole new level! Let me show you how easy it is to make crayon letters for an awesome homemade gift!
I LOVE to make personalized gifts! It’s just so much more meaningful to receive something that was handmade just for you. The time and effort are way more important than a store bought gift.
I found this craft years ago and made these with my girls after a massive room cleaning. We bagged up all the old broken crayon pieces and made new crayons. When my daughters besties birthday came around, I thought of this again. This time we bought a box and let my daughter decide what colors to use.
A week later I realized that I had hit a side business goldmine! I got a few messages from parents asking if I would make them one. And then word of mouth spread. I eventually started selling on Facebook Marketplace and the response was awesome!
These cute crayons are so fast and easy to make! So lets get started!
Supplies
Instructions
1. Set the oven to 275

2. Choose your crayon colors and remove the wrapping. I’ve found the quickest way is to VERY CAREFULLY (and adults only) slice down the side with an Xacto knife or a box cutter. Cutting into the crayon is no big deal as you’ll be melting them.

3. Snap the crayons into small pieces and put the pieces into your silicone mold.

4. Place the silicone mold on a baking sheet and bake the crayons for 8-10 minutes.
5. Remove from the oven when the crayons are completely melted. I usually tap the baking sheet on the counter a few times to release any trapped air bubbles. Then let them cool completely… that melted crayon is no joke!
6. When completely cooled, gently remove the crayons from the mold. And you now have repurposed crayon art!
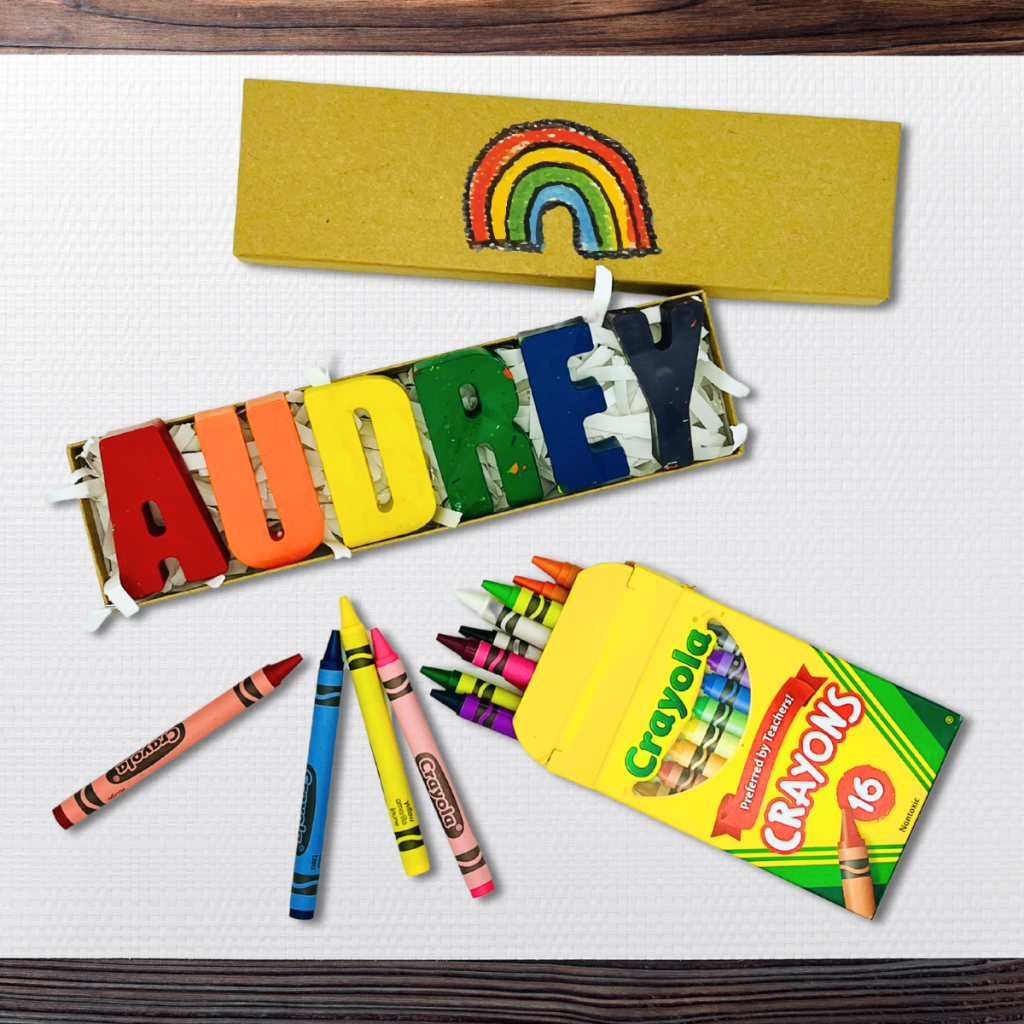
I found these necklace boxes on Amazon and the crayons from my mold fit perfectly! If you’re using these as gifts, this is an awesome way to present them. You can also use cello bags and add some tissue paper or crinkle.
I hope you enjoy making these crayon crafts and I’d love to see what you come up with!
Check out our other Fun Kids Crafts & Activities here!


Leave a Reply
Your email address will not be published. Required fields are marked *